

I have decided to share some of the technical details of my photography hobby in the hope that they will be helpful to others as similar posts have been helpful to me. My standard disclaimer applies, I have no affiliation with any company or product, these are simply my thoughts and solutions. Since I have a travel website the majority of my photography occurs while traveling. This means that I need a reliable way to back up my photos and to cull and tag these same photos. Since size and weight are paramount issues and because I am committed to the Apple platform with iPhone, iPad and iMac, I began by trying to accomplish my goal with the iPad. This was mostly a failure since direct imports overwhelmed the iPad memory and external hard drives with or without a built-in card readers were finicky and did not solve the problem of duplicate images. Additionally tagging, culling and renaming the images was virtually impossible, not to mention the problems at home importing the images into my Lightroom catalog. Thus when Apple introduced the updated MacBook last year I took the plunge and bought one.
Apple MacBook
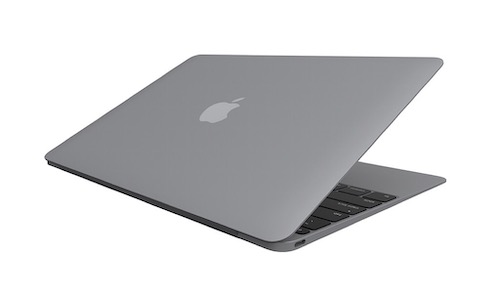
I had a 13 inch MacBook Air before, and found it too large and heavy, thus the switch to the smaller form factor. I considered the 13.3 inch MacBook Pro, but it weighed a pound more (almost the weight of my Sony A7r miii without batteries) and it was thicker and bigger. Also I had owned the 2015 13.3 inch MacBook Air which weighed the same 3 pounds and had considered it too large and heavy to take regularly on trips. The 12-inch MacBook is Apple’s thinnest laptop, measuring 0.52 by 11.04 by 7.74 inches, and weighing 2.03 pounds. The 13-inch MacBook Pro is a bit larger, at 0.59 by 11.97 by 8.36 inches and 3.02 pounds. My IPad Pro in comparison is 0.24 by 9.8 by 6.8 inches and weighs 1.05 pounds. Needless to say, I am thrilled with the form factor and weight of my MacBook and take it with me whenever I travel.
Apple Charger Bricks
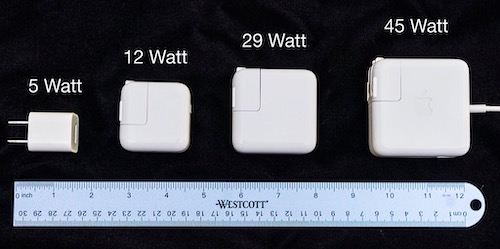

A significant additional issue was the size and weight of the power supply. The 29W USB-C brick that the Macbook ships with is smaller than the 45W adapter for the Macbook Air, and noticeably lighter. In fact, the 61 Watt Charger for the MacBook Pro is an inch bigger on both sides and weighs twice as much as the 29 Watt Charger for the MacBook. I found it interesting that Apple does not list the sizes and weights of their charger bricks on their site. Again, I save weight on the charger for my MacBook, making the weight of the Sony body almost free.
Performance of Lightroom

The next major issue has to do with the performance of Lightroom on the MacBook. The short answer is that Lightroom and Photoshop work very well on the MacBook as I have configured it. I am not really surprised since I researched this issue before purchasing the computer. I have 16 GB of RAM which is the recommended minimum for Lightroom and I store the pictures on an external Samsung 2 TB solid state hard drive (more on that in a minute), giving the program a nice large “scratch” disc on the boot disc of the computer. The MacBook “Core i7” 1.4 12-Inch (Mid–2017) features a 14-nm 1.4 GHz Intel “Core i7” Kaby Lake processor (I7–7Y75) with two independent processor “cores” on a single chip, a 4 MB level 3 cache, an “integrated” Intel HD Graphics 615 graphics processor that shares system memory, 8 GB of default onboard 1866 MHz LPDDR3 SDRAM (that can be upgraded to 16 GB at the time of purchase, not after). I maxed everything out and the Geekbench scores were 3929 (Core i7 Kaby Lake processor, I7–7Y75 @ 1.4 GHz) vs a score of 4301 for the 2017 MacBook 13” Pro (Core i7 Kaby Lake, I7–7567U @ 3.5 GHz 2 cores). I had a chance to use Lightroom on both machines and for me, the 8.5% difference was undetectable. That said, I have a maxed out 2017 iMac at home that I do my real work on and it is considerably faster than the MacBook.
Samsung 2TB T5 Portable Drive
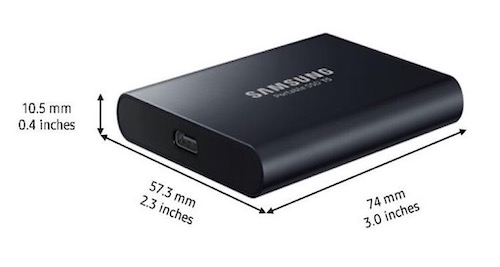
If you use a computer, perhaps the most significant development in the past few years has been the rise of solid-state drives. GPUs continue to evolve at a fast pace, but the improvements in the performance of most other PC components has been incremental at best, that’s if you don’t count SSDs. If you are someone who’s made the switch from a hard disk to a SSD as your primary storage medium, the difference in performance can be like night and day. At 51g (1.79 oz) and 74×57.3×10.5mm (3.0×2.3×0.4 inches), the Samsung T5 is practically identical to its predecessor, the T3, in terms of size and weight. I have used the Samsung T series since the T1 and I believe they are the fastest and most compact on the market. With the T5, the company has gone state-of-the-art with 10Gbps USB 3.1 Gen 2, and with the exception of random access times, the numbers are as good or better than an internal SATA SSD drive and about 20 percent faster than the T3. I carry both the 2TB T3 and T5, backing up my photos and each other. It is not cheap (about $740) but it is durable, small and fast.
Wires and Chargers
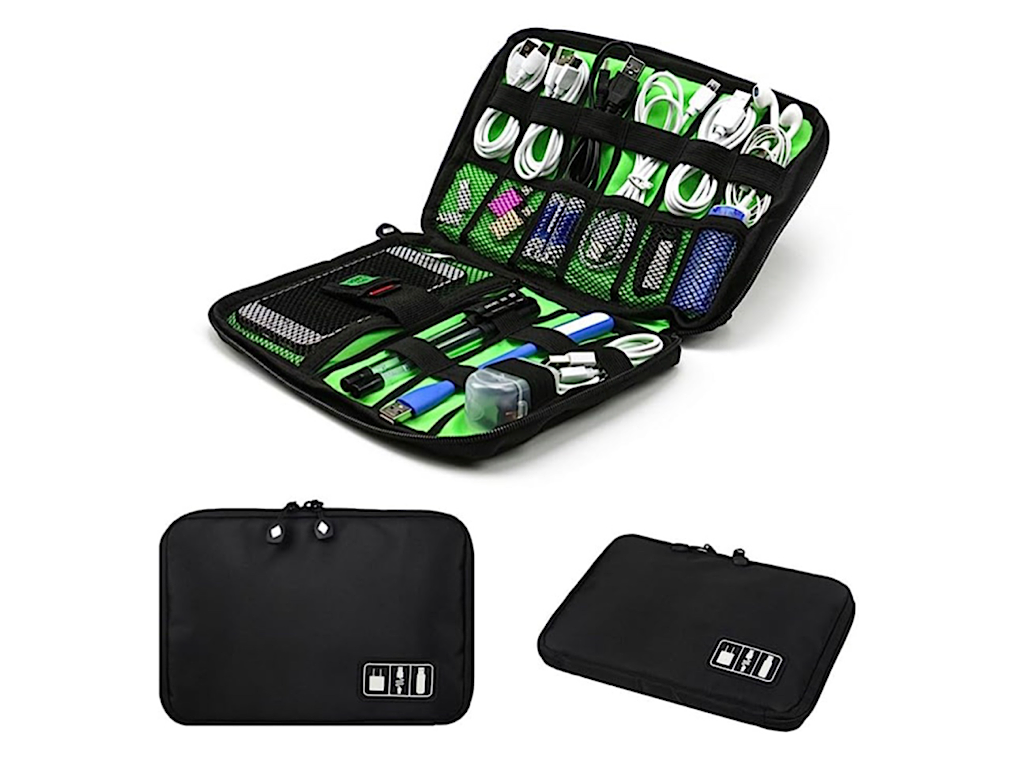
Keeping track of all the small pieces and cables can be a headache when you travel. I have found this small waterproof case to be particularly helpful in controlling the clutter. There are many versions of this, all of the around $10. I use it to store my battery backup charger (Morphie XXL), Samsung portable hard drives, Anker 40W 4-Port USB Charger, my iPad and all the adapters and wires that go with the lot. I have tried a number of cases before but this is hands down my favorite. Before I got this inexpensive case I would lose a part or cable on almost every trip, now that is a rarity.
Importing Photos to Lightroom
When I import photos to Lightroom while traveling, I usually only add copyright, creator and location information. I change the names and develop previews later.
Lightroom GPS Data

Up until now most cameras did not have built-in GPS. Recently low power Bluetooth has become available on some cameras including the Sony a 7 riii and the Panasonic G9 among others that allows acquisition of GPS information from your phone. To get around the problem of geotagging images I have used an iPhone program called Geotag Photos Pro 2 available for the iPhone and the Apple Watch. It is convenient to start and stop on my watch and it offers a low power drain on the iPhone. It takes a GPS reading at predefined intervals and continues as long as it is on, producing a GPX file. The file can be transferred to your computer by a variety of methods, I use Airdrop since it requires no network. On the computer, you can utilize the GPX file to geotag your images directly in Lightroom or use the Geotag Photos desktop application. This system has worked well for me, do not try the Garmin watch, their software is impossible to use.
Lightroom Catalog Structure

My standard catalog procedure is to organize by year and use subfolders for activities and trips. In a very general sense, the catalog file structure identifies the when and where of the photos. This approach is easy to implement while traveling, working for both the short-term backup and for the long term catalog structure. Many experts advocate not organizing by just the date and I agree, Lightroom can organize by date without folders. I organize by years just to make truncating the catalog for performance reasons easier. The subfolders are organized by trips or projects and since I am an amateur photographer this arrangement works well for me. For example, in the above example, I visited Africa in 2017 and had three separate experiences, a safari in Botswana, a tour of Madagascar and a visit to Cape Town. For my grandson, it is sufficient to have all pictures of him for the year, with the exception of his birthday which I separated out. There is no right or wrong way to do this, just use a system that allows you to remember where you put the photos.
Cull Using Flags
I cull the images at this point, but only the most egregious ones, mostly out of focus using flags. To assign a flag to one photo, select your photo and click on the pick or reject flag in the toolbar. To remove a flag from a photo, click again on the flag in the toolbar that you assigned. You can also use shortcuts: “P” for Pick, “X” for Reject, and “U” to unflag a photo. If you hit the caps-lock key, the photos will auto-advance making the process even faster (this caps-lock trick also works for colors and stars). Most photos remain unflagging at this point, with only a smaller set of great and rejected photos. I find this method is more mindless and faster than using five layered star or color system, better when traveling. Since my MacBook screen is small I use the Lightroom shortcut “F” to enlarge the photo to full screen. The flagging works just as well in this mode.
Expand the Metadata
I add notes to the metadata while events are fresh in my mind. I also take the opportunity to observe what I missed and try to fill in with more photography, in the succeeding days, on the most interesting subjects. Names of people and places are all recorded on the photos metadata. When I get back, I go through the images on a bigger screen, making additional notations, like species names, or any other things that require research. The whole point of the photography, aside from the fact that I really love photography, is to write posts for my website encompassing the essence of what I have seen. I take the best photos and place them in collections, divided into collection sets.
Controlled Vocabulary and Hierarchical Keywords
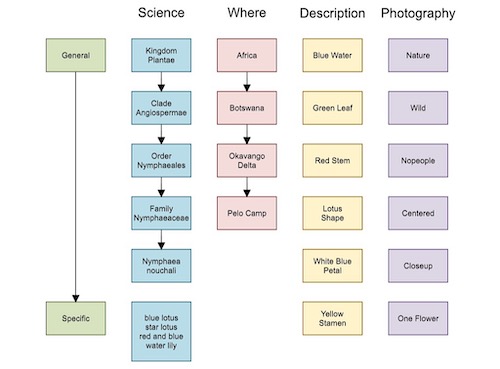
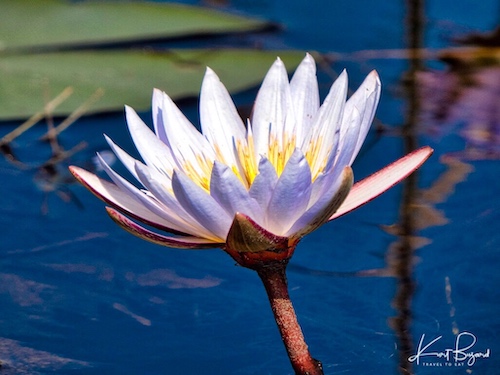
Keywording can be hard, tedious and monotonous work which is why most hobby photographers do not keyword their images. The advantages include ready access to your collection if you are a pro or, as in my case, if you plan to write posts, papers or books using your photography. In this brief introduction, I cannot give you all you need to know but I have included some references to get you started. The key to effective tagging is to control the keywords you use to tag your photographs. Called “controlled vocabularies,” limited lists of keywords have also been around for a long time. Aristotle used them when classifying animals. Humans love hierarchical lists. They are the basis of the classification of all the plants and animals and the basis of libraries catalogs. In the figure above, I have provided four approaches to categorize the Water Lily from Botswana also pictured above. These approaches are not exclusive, you may mix or match as you please, depending on the purpose for the catalog. The key is to be precise, avoid different names for the same thing and be consistent.
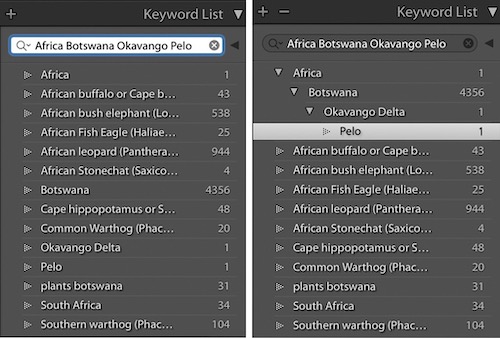
Hierarchies are all around us, it is how we make sense of the modern world. Lightroom understands this and allows for hierarchical or nested keywords, just as it allows for nested folders and collections. The power of this technique is large and the practical impact is typing fewer keywords. An example will help illuminate the practical benefits of nested keywords. I saw this Water Lily while I was staying at the Pelo Camp in the Okavango Delta which is contained in Botswana which is part of Africa. To add these keywords would require four entries, with nested keywords, you only need to enter Pelo. How’s that done? Simple. Drag the keyword “Pelo” over the keyword “Okavango” and drop it. The list changes, and now “Pelo” is indented to the right, and Okavango has an arrow next to it. Do the same for Okavango – drag it over “Botswana” and drop it, and that indenting thing happens again, once again move Botswana over Africa. “Pelo” is now three levels down and if you use it as a keyword, it gives you Africa, Botswana and the Okavango Delta for free.
Keyword Synonyms
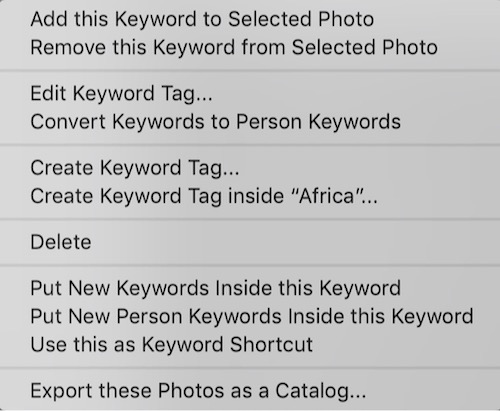
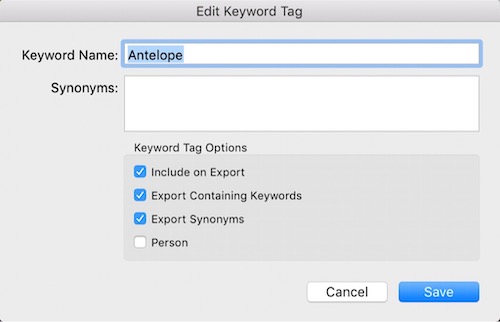
So thus far, we have shown how to connect keywords in a vertical hierarchy. To connect keywords horizontally through synonyms, right click on any keyword in the keyword list. You will get the drop-down shown above. Click on “Edit Keyword Tag” and you get the “Edit Keyword Tag” dialog box. Here you can add additional synonyms by entering a single root keyword. In a sense, Lightroom provides for a net of connections between keywords rooted in the photograph. Like a map, these connections provide an intellectual point in the sum of knowledge on the items contained in the photograph.
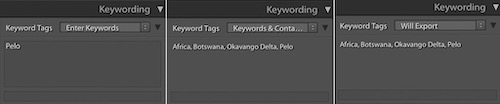
There are three views in the keyword drop-down, even though the keywords in all the views are searchable. Of course, which one of these is most useful to you depends largely on what you’re doing at the time. I find the “Will Export” is the most useful.
- Enter Keywords: with only the ones you actually typed in
- Keywords & Containing Keywords: with all the hierarchy including non-exported ones, but no synonyms
- Will Export: with all the hierarchy and synonym keywords included except any marked as “not exported”
Keyword Tips and Tricks

In the grid view, click on the Painter icon in the Toolbar (it looks like a spray paint can – press the ‘T’ key to reveal the Toolbar if you don’t see it) and select ‘Keywords’ from the drop-down menu. Type in the keywords you want to add (in the box just to the right). Now all you have to do is click on a photo thumbnail to add those keywords to that image. It’s a very fast way of working in Grid View.
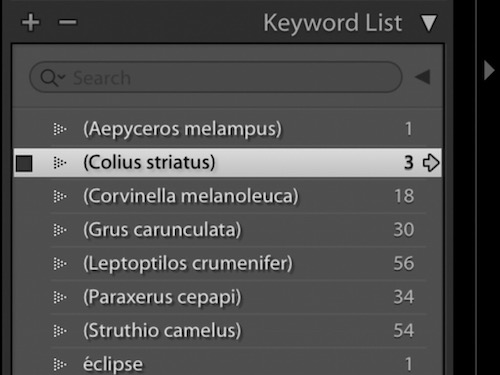
The Keyword List panel lists all the keywords that you have applied to images in your Lightroom Catalog. If you want to see all the photos tagged with a specific keyword together, hover over the keyword and click on the white arrow that appears on the right-hand side. Lightroom brings them together in Grid View. This is one way of searching images by keyword.
Finally, you can use Smart Collections to gather together images tagged with specific keywords automatically. Go to the Collections panel, click on the ‘+’ icon in the top-right corner and select the Create Smart Collection option. Set Match to All, select ‘Other Metadata > Keywords’ from the drop-down menu in the first column and then type the required keyword in the blank space provided.
Lightroom Keyword Sets
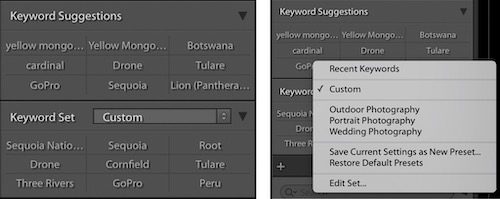
Keyword Sets are found at the bottom of the Keywording panel. They are there to help you organise your keywords, and overcome the problem caused by the fact that it becomes more difficult to maintain consistency the more you use keywords. There are several keyword sets included with Lightroom, with titles such as Outdoor Photography, Portrait Photography and Wedding Photography. You can also create your own custom sets. Creating your own set can be fraught with difficulties, too many or too few, synonyms, context issues (orange fruit vs the color orange) and many others. What you may or may not know is that you can export and import Lightroom keyword sets and that there are complete sets for different subjects available on the internet. One place to look is the Lightroom Keyword Project, listed below. This can give you a head start on creating your own custom set. Another use of keyword export and import is to share your keyboard set with your travel laptop.
While Lightroom may or may not be the best editing program, it certainly is a mature environment in terms of the database. While it looks simple, and can be in many instances, there is power hidden in the menus. I hope that this introduction to keywording will be helpful to you and perhaps encourage you to add more keywords to your workflow. As always I hope you enjoyed the post, please leave a comment.
References:
Elvoes Electronics Accessories Case, Waterproof Portable Cable Organizer Bag