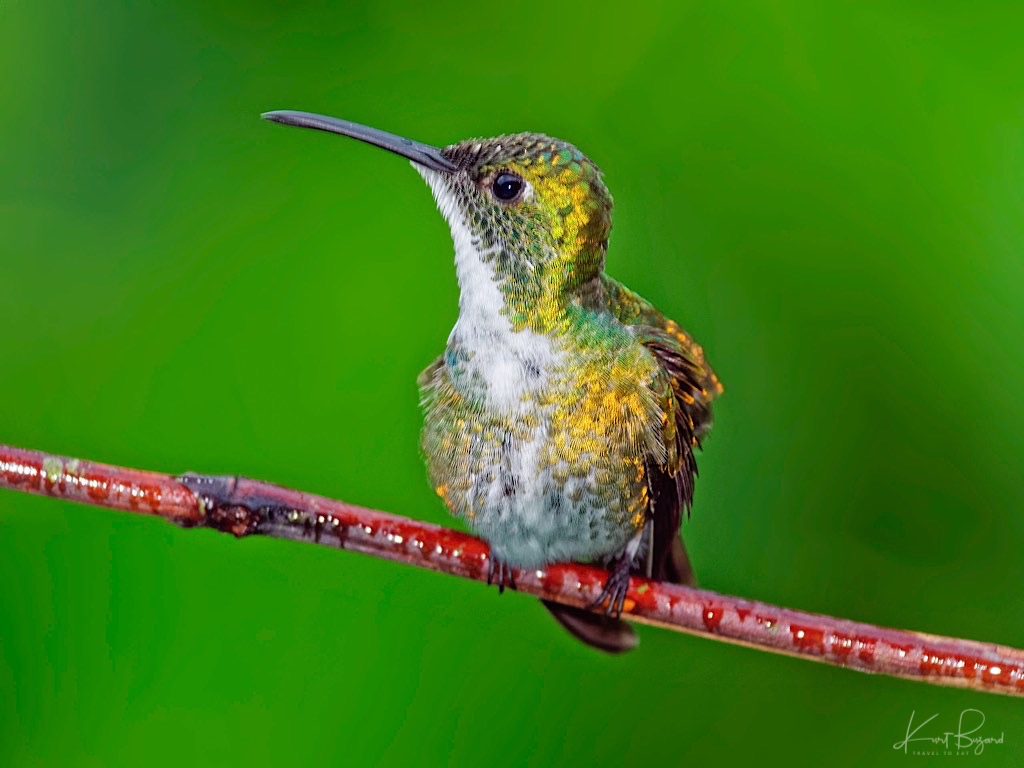
About a year ago I had a good fortune to attend a tour of Costa Rica with a small group of photographers who all used flash photography. While I had used flash for macro and portrait work, I had not up until that time, tried to use flash for bird photography. My fellow travelers were very generous with their time, patiently explaining their choices of equipment and various techniques for getting the best flash photography. I was impressed with the photographs they obtained on the trip and since that time I have acquired a similar setup tailored to my lighter micro 4/3 equipment. What I have learned is that while flash photography can yield impressive results, it requires a certain adaptation of of shooting preferences. Feeders and blinds with feeders are ideal, allowing positioning of bulky equipment in positions with the best light for optimal photography. Flash photography is less well adapted to spontaneous use in unknown locations such as trails and roadsides, although a flash with a monopod can be very useful. The advantages of flash can include fill light for awkward lighting situations or in harsh noon light, decreased noise, more vibrant colors and increased detail. As a very nice side benefit, flash can reduce ISO thus rendering a smaller sensor camera virtually equivalent to a camera with a larger sensor. I thought I would share what I have learned in in this post. Please note that all photographs can be enlarged as is true throughout my blog and I encourage you to enlarge each of the photos.
Increase Light, Decrease Noise
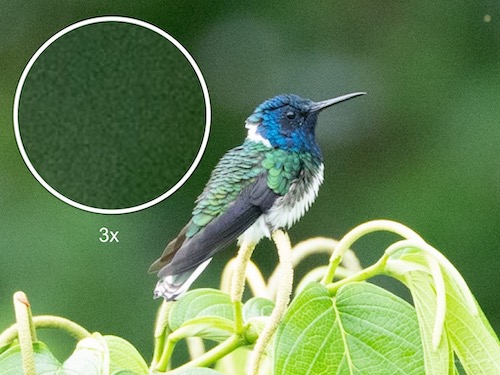
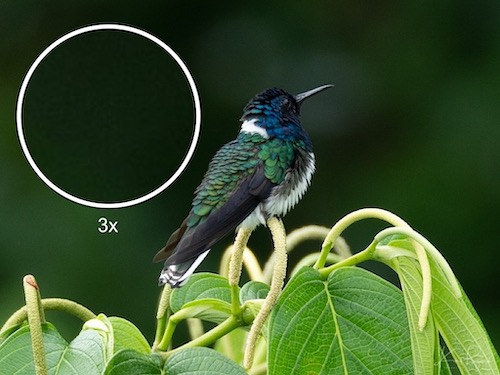
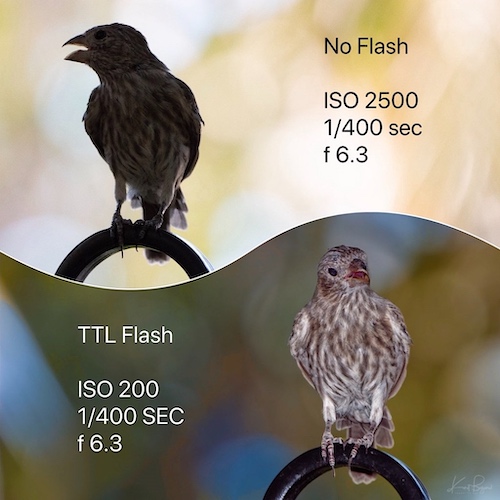
As my longtime readers know, I am a fan of micro 4/3 for several practical reasons. I currently use a Lumix G9 with the Leica 100–400mm f/4–6.3. First, the combination of camera and lens is much lighter and the lighter weight combined with excellent lens/sensor stabilization (IBIS) allows for excellent handheld photography. Also, the 2x crop of the micro 4/3 sensor makes the excellent Leica 100–400 mm lens into a 200–800 mm lens, making small birds just that much closer. Last but by no means least, the Panasonic/Olympus cameras and lenses are affordable. One downside of the smaller sensor is more noise in low light compared to a full sized sensor. Fortunately, the smaller sensor performs almost the same as a full sized sensor at ISO 200 since most modern sensors are marvels of engineering. Thus adding even a little light will yield big returns in both reducing noise and increasing dynamic range.
DXO Can Reduce Noise and Sharpen Images
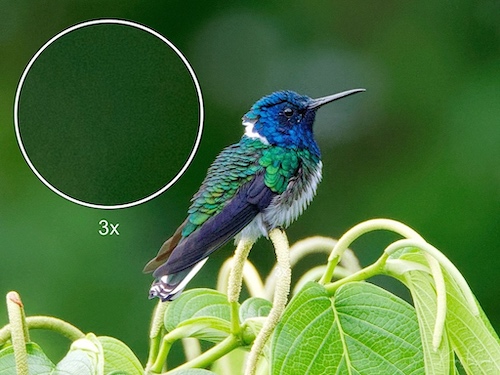
If you are a nature photographer, particularly of birds, you probably already use DXO software in post-production. DXO Lab3 has a proprietary noise reduction called DXO Prime, automated optical corrections tailored to individual cameras and lenses, localized contrast called DXO Clearview (similar ging dehaze in Lightroom) and some really nice sharpening tools. Even though DXO Lab 3 can work miracles with noise and sharpening, it still is not quite as good as the image shot with a flash at ISO 200. This discussion is relative to the use you intend for the photography. On the web, no one will notice but if you intend to enlarge the image for prints, you will need to use further postproduction tricks.
Flash Brightness over Distance
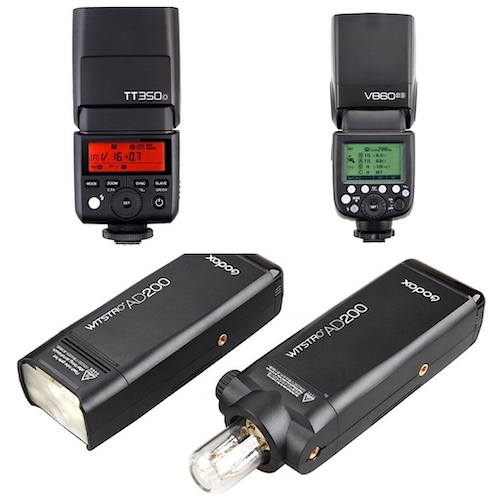
The beam from a flash unit is cone-shaped. Photograph a relatively close object and most, if not all, of the light cone will cover it. But as you move the flash farther away, a smaller portion of the light cone hits the subject, as more of the light sprays wide of it. At a great enough distance, the flash’s light becomes imperceptible to the eye as well as to a sensor or film. Flash falls off as the square of the distance. In plain lingo, this means that if you move twice as far away from your subject, you get only one-quarter the illumination on the subject. Triple your distance and you get only one-ninth the light. I use all of the Godox flashes shown above for different purposes, because they are reliable, have good rechargeable Li-ion batteries, they are relatively inexpensive relative to Prophoto or camera specific brands and I can use them together in multi flash configurations. There are some advantages to some other flashes, Canon has two forms of TTL (through the lens), A-TTL and E-TTL. In E-TTL or Evaluative-TTL, the camera measures the light without the flash and the light with the pre-flash. It then uses information from the two readings to determine the flash settings. Other flashes have a greater adjustment range of both manual and TTL. As a practical point, a camera mounted flash without a modifier is only useful within 5–10 feet.
Magbeam and Better Beamer
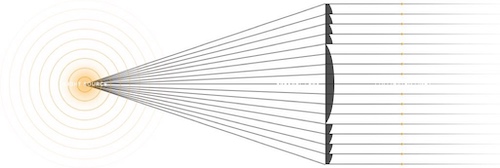
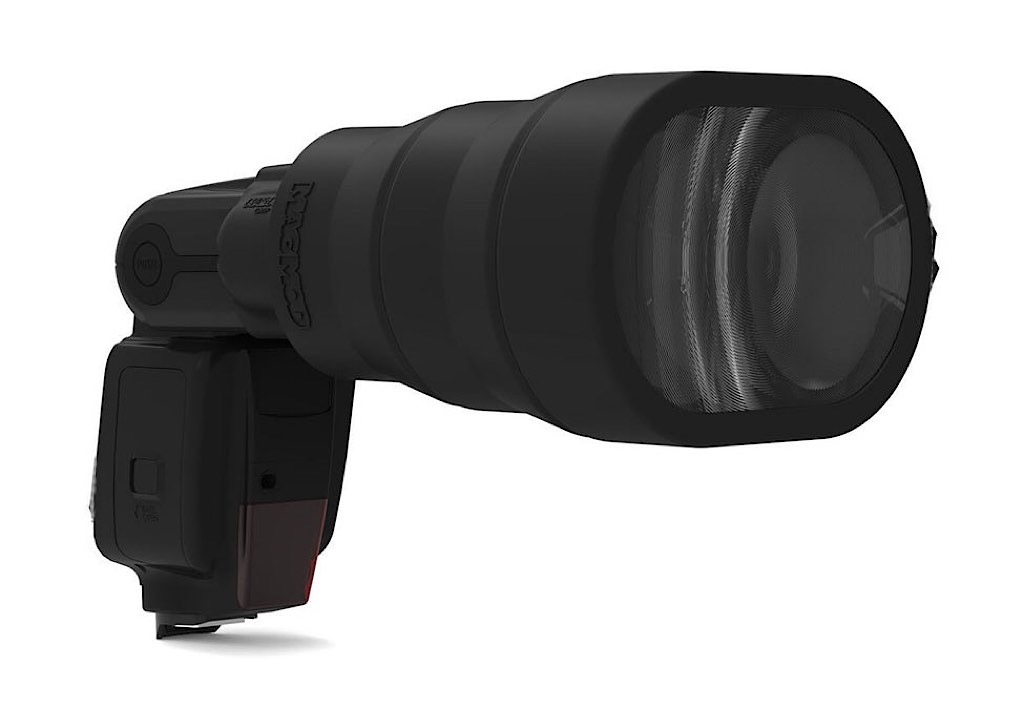
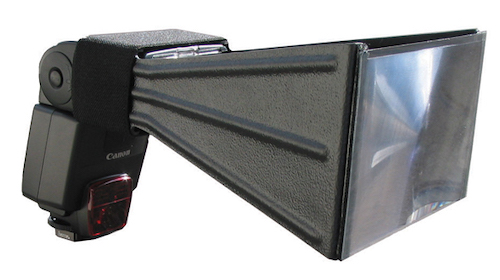
One way to extend the range of a flash is to place a converging lens at some distance from the flash. Since a large glass or plastic lens would be too heavy, the practice has been to use a thin, lightweight fresnel lens about a foot or so in front of the flash. There are basically two versions of this setup, the older Better Beamer (held on the flash with rubber bands) and the newer Magbeam, made of soft rubber and held on the flash with magnets. In terms of ease of use, the Better Beamer is more fussy to setup, requiring different models for different flashes and takes time to setup and remove. Since I sometimes add, remove or modify during shooting, the Magbeam is more convenient. Both systems will tend to sag at the fresnel lens side, some people will use a bracket on the gimbal to hold it up. I use a little piece of foam to support the Magbeam on the telephoto lens. This is not a small point, the lens does a very efficient job of focusing the light. If the Magbeam sags, the light spot may not hit the target. It is generally a good idea to test the Magbeam with a wide angle lens to be sure the condensed beam is in the middle of the frame.
Jobu Junior 3 Gimbal
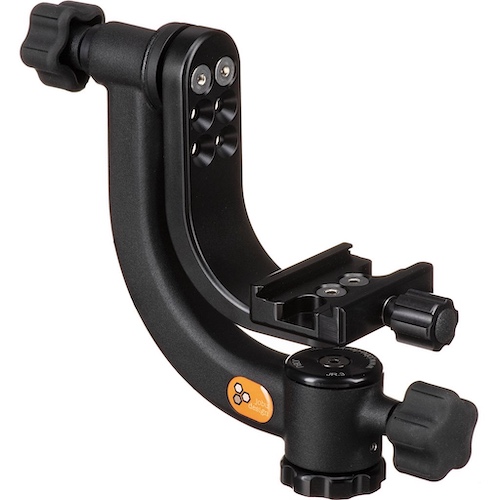
A gimbal is a type of tripod head that allows you to perfectly balance the weight of your camera so that it can be moved effortlessly both vertically and horizontally. With a perfectly balanced gimbal you can move even the heaviest setups, such as a 600mm lens and pro-sized camera body, with just the tip of your pinky finger and almost no effort at all. A camera on a gimbal is always ready to go because you can just take your hands off it without needing to lock any pan or tilt knobs as you do with a ballhead. Then, when the action starts, all you need to do is grab the camera and spin it quickly towards your subject. I personally use the Jobu Junior 3 which is a compact version of the well known Wimberly gimbal. Many photographers rely on the Jobu Junior 3 Gimbal because it weighs half of many heavy-duty gimbal heads, 1.4 lbs. compared to 3 lbs., and is almost half the size, with a smaller footprint when folded. This head has a one-piece hollow heat-treated body making it extremely stiff. Needle roller bearings allow smoother tilting under heavy loads and better adjustment of friction. For travel considerations, the Jobu Junior 3 has an overall profile of 9 x 8” (22.86 x 20.32 cm).
Leveling Base
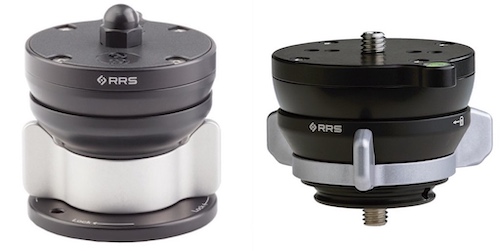
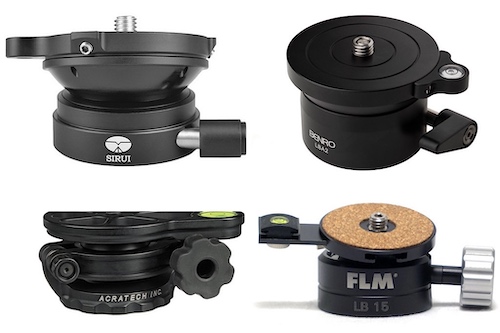
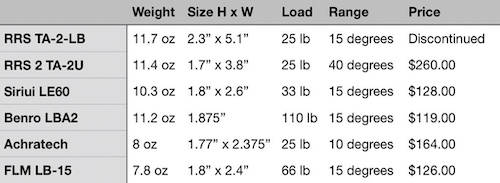
If you are going to use a gimbal head, you will need a leveling base to avoid the time consuming process of adjusting tripod leg lengths. You can also buy a tripod with a leveling bowl built in although I personally find the larger apex to accomplish this males the tripod bigger to pack. I personally prefer to have a separate leveling base and I have listed some of the more popular choices above. I find a leveling base invaluable, particularly in situations when I want to push the tripod flush with a railing on bird observation verandas. When I bought my RRS TVC–24L Series 2 tripod, I bought the RRS TA–2-LB leveling base which has since been discontinued. While I have been very satisfied with this leveling base, I will probably replace it with the RRS 2 TA–2U sometime in the future. I have a few comments about the available leveling bases in addition to the specifications listed above. The FLM LB–15 has a removable leveling bubble which makes it more compact and adaptable to larger based heads but leaves you with a small piece that can be lost. Otherwise the price, size and reviews look really good to me. Two level bubbles are available, the HSA–45 and HSA–80 which differ in length. The Acratech leveling base has several reports of not terribly smooth adjustment which makes it hard to recommend. Additionally it can shift when locking down. I personally love Sirui products but the the locking lever of the base can come to a stop against the top of the tripod. Although levers can generally be pulled out and reset when they run into obstructions, I am not a fan of lever locks, I personally find them less secure than knobs, both for this example of leveling bases and for Arca Swiss clamps.
Uniqball
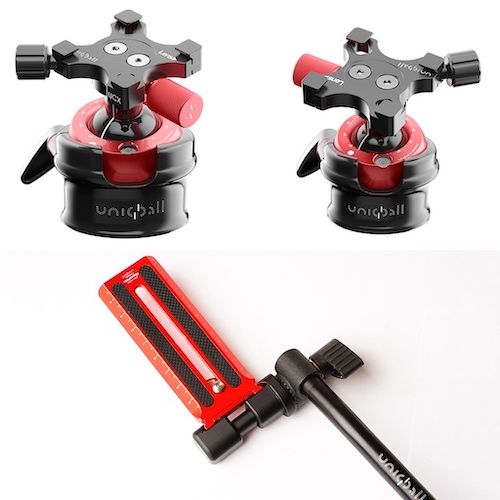
While I am describing leveling bases, I thought I would include the Uniqball that has a leveling base built in. The Uniqball 35XC is a ball head, a gimbal and a pan / tilt head in one unit, with a loading capacity of 33 lbs (1.12 lb, 3.74” x 2.2”). Equipped with a built in leveling base and bidirectional clamp, I personally use this ball head for birding, landscape and general use. I am also very fond of the optional panning arm which makes this head into a true pan/tilt head which gives an exceptional degree of accuracy in the field. While a tilted horizon can be repaired in Lightroom, the correction shaves off a few megapixels and is unnecessary with this gimbal/ball head. They also have a larger version, the 45XC with a 90 lb loading capacity (1.62 lb, 4.1” x 2.6”).
Center Column vs Spider Tripods
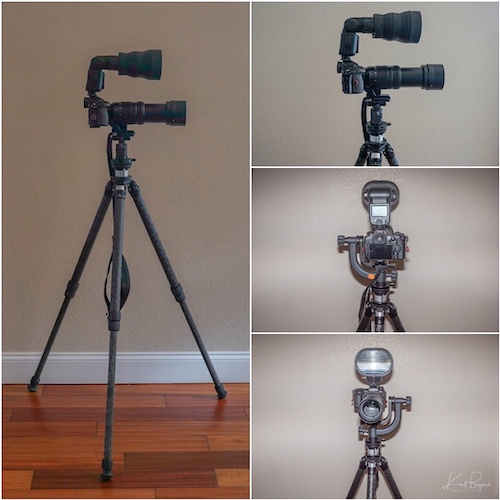
A tripod having no center column is more stable than one with such a column. Without a center column, finding a way to rapidly change the height of your lens while shooting requires some creativity. If your tripod has extremely long legs, you can open them extra wide when shooting at eye-level, and then pull them in when you need to quickly raise the level of the lens. Adding a center column assembly to the apex can reduce the stiffness of the mount between the platform and the apex, increasing the likelihood of vibration. Extending the column itself compounds this, inviting outside forces such as wind to further influence the camera and lens due to the loss of lateral stability. In terms of practical use, it can be far more convenient to use a tripod without a column in the field, especially on non-uniform surfaces. With a ballhead directly mounted to the apex, the only requirements for extending the legs are to get the camera positioned where you need it. The legs need not be at even angles or evenly extended at all. Conversely, since a center column needs to be level to be a truly vertical adjustment, the extension of the legs must be more carefully set, although still not necessarily even. This means more time must be spent with every setup ensuring the apex and column are level. I use the RRS 24L MK2, with 4 leg sections, max height 88.4”, flooded length 23.3” and weight 3.84 lb. Most of the time I only use 3 sections, since with the leveler and gimbal, this puts the camera at eye level.
Flash Modes
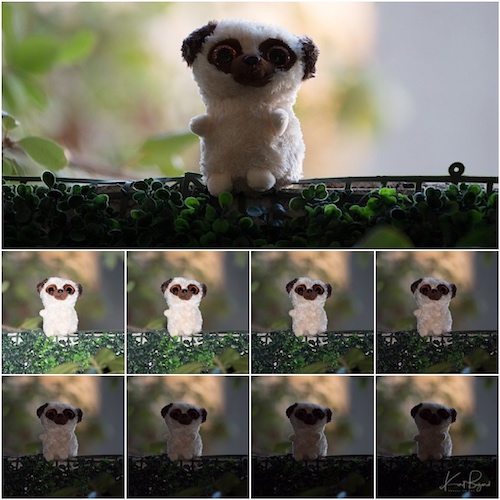
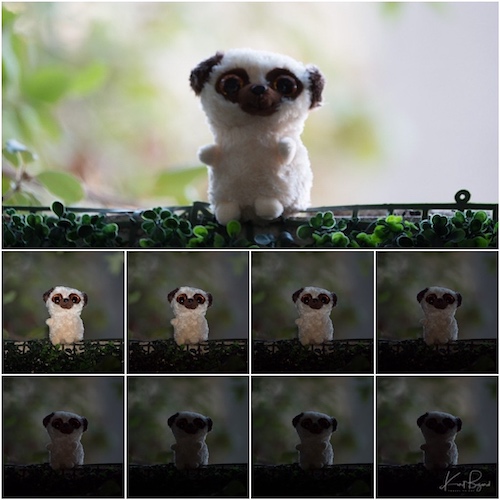
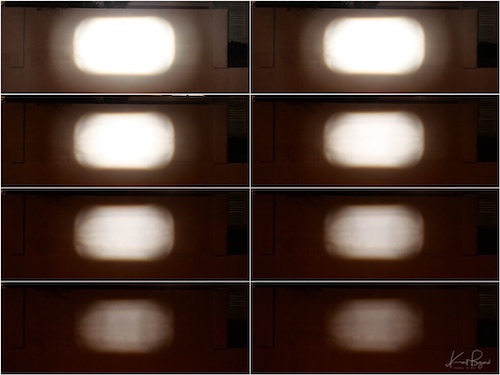
It is hard to compare flashes without sophisticated light meters which in turn yield measurements which are difficult to interpret. In these two collages I have demonstrated the difference between the Godox V860 II and the smaller Godox 350. In all of the flash photos I maintained an ISO 200, f/6.3, 1/60 sec changing only the flash power in manual mode. As you can see, the larger Godox 860 II is more powerful than the smaller Godox 350 at this distance and with these settings. At longer distances, the flash speed would need to go down and as a last resort, the ISO would need to go up. Generally, manual flash mode is reserved for special situations, since as the distance and ambient light changes, the flash settings would also need to change. Manual flash is best in scenarios where you want the most control over the light source. Of course the distance between the subject and the flash cannot change rapidly, or you will not be able to adjust the flash rapidly enough.
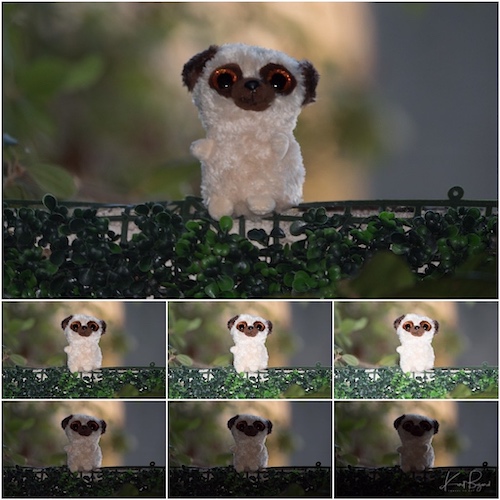
There are three modes on Godox flashes, and as far as I know on many other flashes. Pressing the mode button will cycle through manual, ttl and multi modes. I will not discuss the multi setting here, it basically takes several flashes during a single exposure and is a subject for another post. TTL (through the lens) mode is the most useful mode for nature photography although manual mode can be very helpful in select conditions and is more accurate. A TTL enabled flash fires a “pre-flash” before the actual shot is taken, when the shutter is half depressed. The camera then measures the pre-flash with the ambient light level to calculate the power needed from the actual flash to make a correct exposure. This pre flash happens really quickly, only micro-seconds before the main flash, and thus cannot be seen by the human eye. I use spot metering in birding and the Godox flashes have worked well for me. In TTL mode on a Godox flash the EV (exposure value) can be adjusted from –3 to +3 in 1/3 EV increments. For sitting birds I prefer TTL, for small birds in flight I generally setup near the feeder with manual flash, with or without the Magbeam depending on distance.
Setting the Flash And Camera Parameters
So we finally come to the preferred settings for the flash and camera. The very first thing to mention is that a single flash with a Magbeam will not stop motion. In fact, the opposite is often true, the shutter speed is often slower than without the flash due to background darkening and my goal of reducing ISO. Since my goal is low noise, high dynamic range photography, my standard settings in good ambient light are f/6.3 since that is the lowest with the 100–400 mm lens, ISO 200 and I shoot on shutter priority. The starting settings for the flash are TTL mode set with –0.7 to –1.7 EV. The idea is to lightly light the subject, like a fill light. I intend to write a separate post to explain which of the sometimes confusing buttons to use on the flash itself, I just think it would be too much in this post.
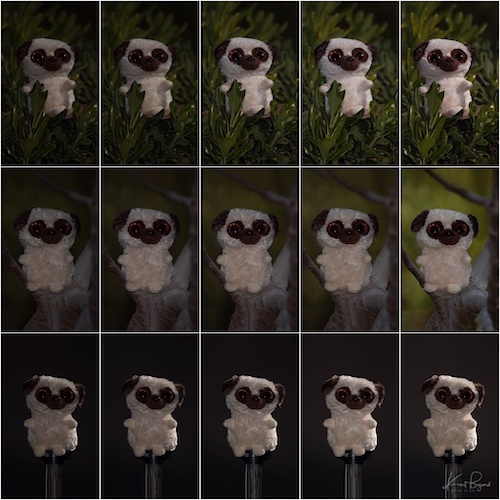
Without a flash you usually want the light falling on the front of the bird, rather than coming from behind it. With flash, everything is turned backwards, you want the light coming from behind the bird, if the bird is on a branch with nothing behind it, since the background will darken with flash. Alternatively, with leaves or something to reflect light in the background, you can also get a good shot with light behind you. As the light fades near dusk or dawn, first raise the TTL compensation (or switch to manual, after that raise the ISO or switch to auto ISO with slower shutter speeds. If you are in direct sunlight, you can stop motion with these camera speeds although the flash is not stopping motion, just providing additional light. If I am really set on a location with a dark background, I will sometimes use the Godox AD200 to illuminate a screen or just some plants in the background.
Examples
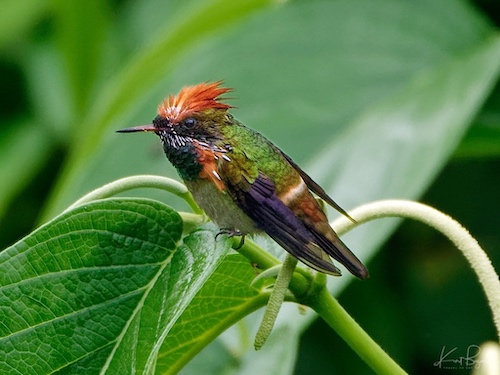
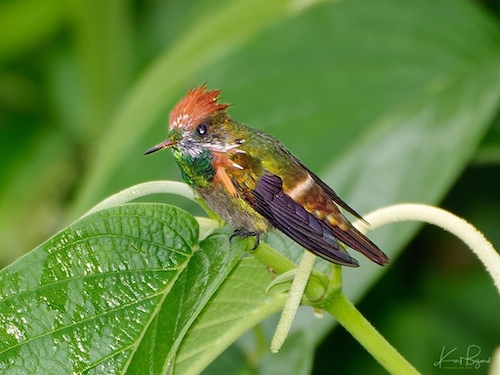
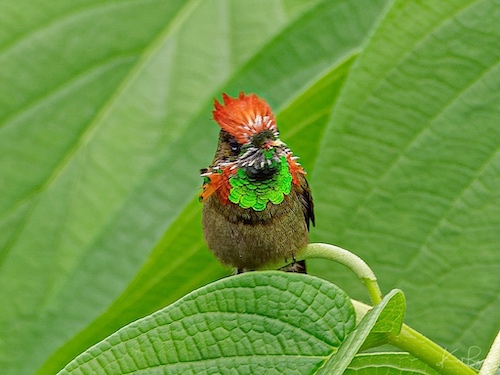
Here we can see that flash brings out the green inflorescence of the hummingbird in the bib. Part of the favorable outcome of this flash photo is the leaf in the background which brightens up the surrounding area. You can see a little “red eye” which can be fixed in post or avoided by mounting the flash higher. This setup is already cumbersome, so I just deal with red/white eyes afterwards but some photographers do have a rig to elevate the flash.
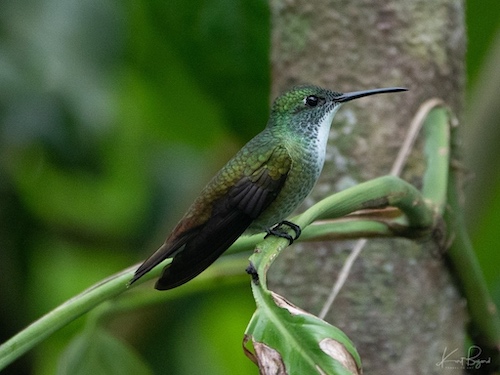
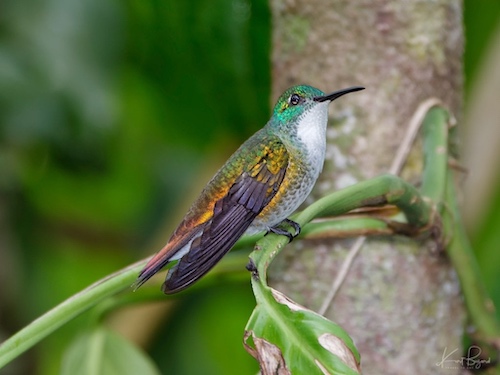
Here is another example of the benefits of flash in capturing the inflorescence of hummingbirds. This Copper-Rumped Hummingbird looks completely different with the addition of a little flash. I would like to point out that a little flash goes a long ways in hummingbirds. It is easy to overexposed inflorescence thus losing detail and making the bird look unnatural.
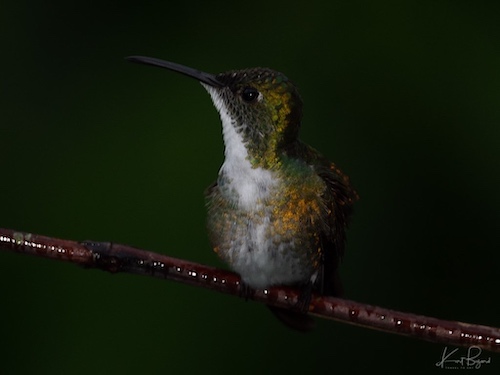
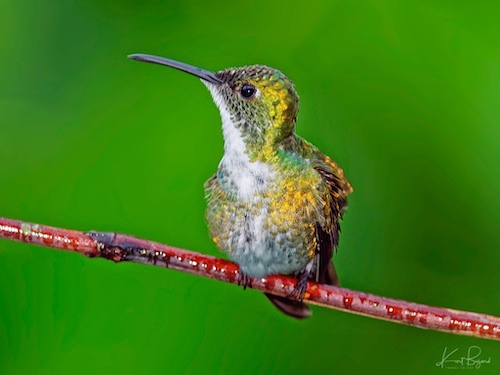
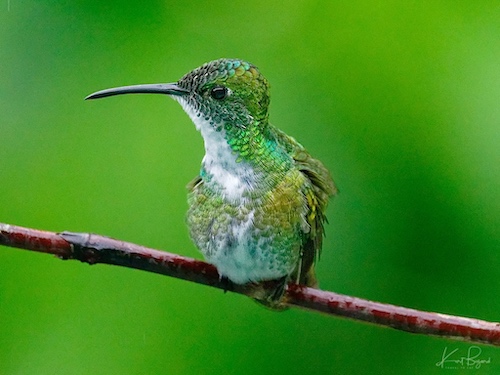
Here I want to show how underexposed I can go with hummingbirds, with the original image very much on the dark side. After processing, the delicate gold inflorescence is breathtaking, preserving details. Just for comparison, I have included the same White-Chested Emerald without flash, again almost a different bird in appearance. Without the flash the namesake emerald colors predominate. I hope this drives home the point that you need to take photographs both with and without flash to fully represent any particular bird species.
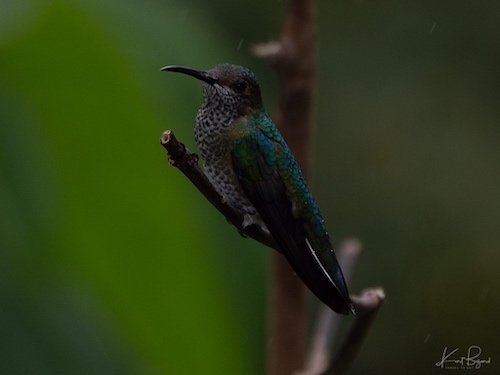
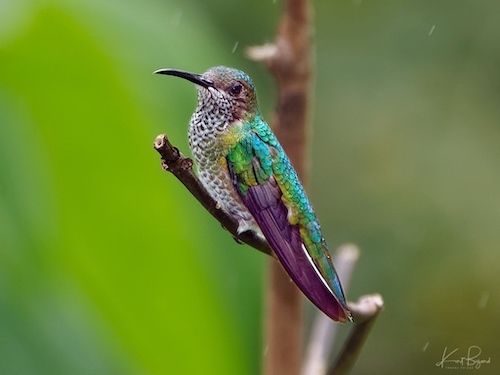
Here is another example before and after processing with DXO Lab 3, this time a female White-Necked Jacobin. I normally try to not make the original quite this dark but I wanted to drive home the point that at ISO 200 you have a lot of dynamic range. Thus the final image is detailed with rich colors. In the field, feel free to experiment with different exposures, take them home and process them. You will soon see the exposure range that is best for you. Keep in mind that in real life, with changing distance and ambient light you will probably get a lot of variation whether you like it or not. By the way, those white lines in the photo are not sensor dust, it is rain.
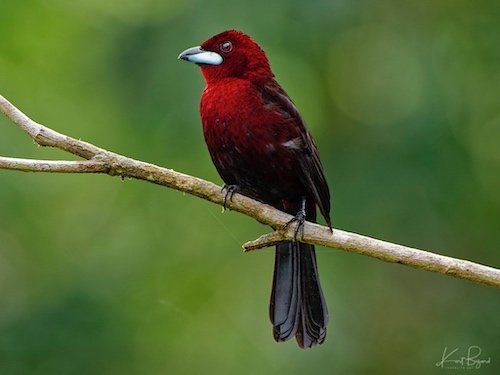
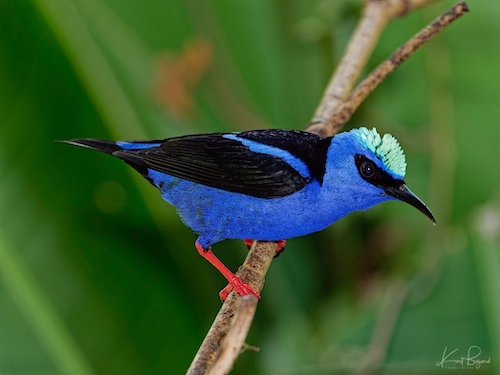
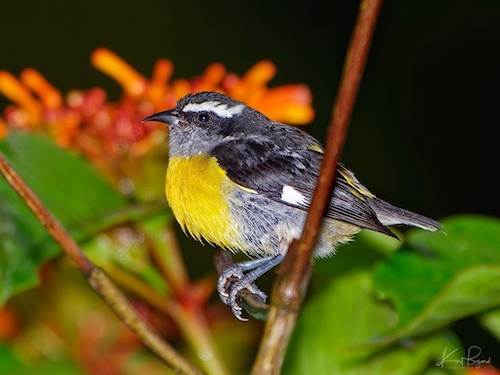
I added a few flash photographs of regular birds (not hummingbirds) to show the benefits of flash for them as well. You get the same noise reduction, better dynamic range and more vibrant colors with excellent resolution of fine details.
Multi Flash
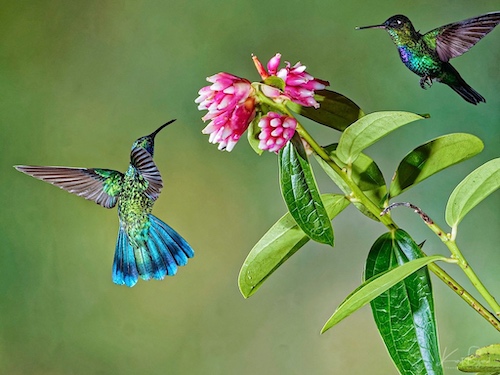
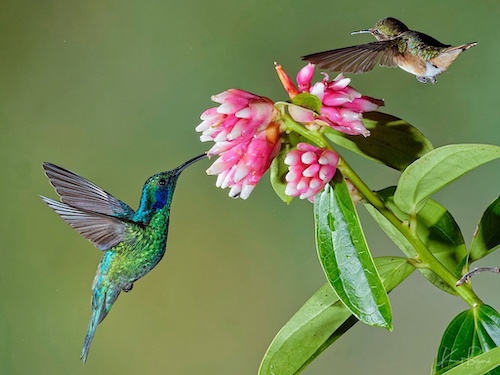
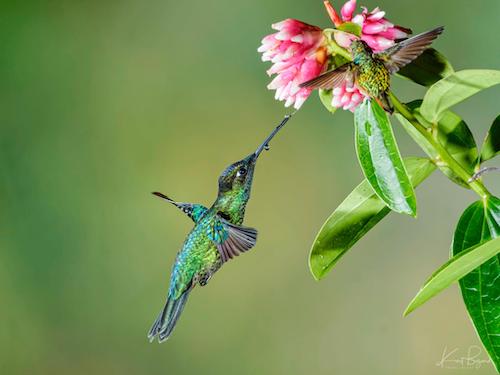
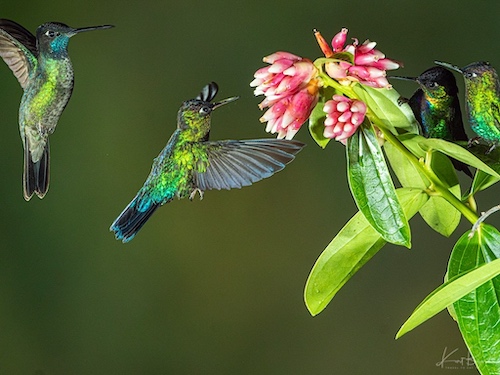
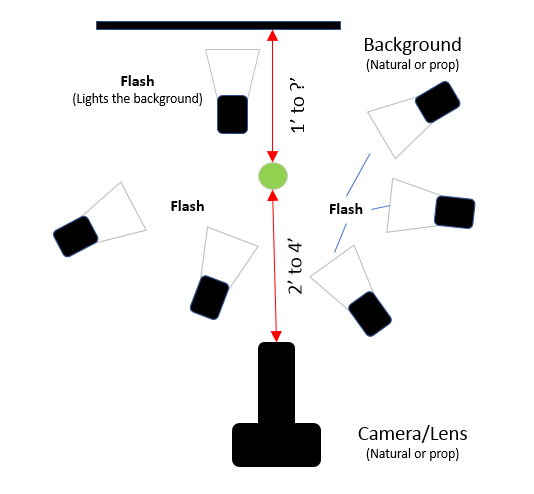
In the beginning of this section, I stated that you cannot stop motion with flash due to the blurring effect of ambient light. When ambient light is low, such as dawn or dusk or inside a covered structure which reduces ambient light, a number of strobe flashes can stop motion. On my most recent trip to Costa Rica with Tropical Birding I was able to take the above photos with a multi flash setup by my fellow photographers and the guide. In some of the photos, the flash lighting the background failed giving some insight into the setup. I got some lovely “stop motion” photographs of hummingbirds but I do think the setup could have been simplified with more use of reflectors and umbrellas along the lines of “butterfly lighting” for portraits. Due to the fact that all of us were birders, not experienced studio photographers, no light was directed from above. Thus the Talamanca Hummingbirds could not show their inflorescence on the head and neck. Since stopping motion in hummingbirds is the equivalent of building a studio in the field, we can expect more refinement of studio techniques for hummingbird photography in the future.
As always, I hope you enjoyed the post. Despite the difficulties and additional equipment, flash photography is a fascinating addition to bird photography. All the extra equipment for flash sort of kills my “travel light” mantra and this sort of photography is best suited to photography in a fixed location. However, if you decide to take the plunge, I hope this post will inspire and guide you.
References:
Sony a7riii vs LUMIX G9 for Bird Photography
Camera and Lenses for Pet and Wildlife Photography
How to Use CTO Gels and A Better Beamer Together for Bird Photography
Wimberly Sidekick Gimbal Attachment
Five Reasons the Jobu Junior 3 Gimbal Head is a Must Have Tool for Every Wildlife Photographer
A Guide to Using Flash with Wildlife
The Best Fill Flash Settings for Fashion
Multiple Flashes for Multi Flash Stop Motion with Hummingbirds
Tropical Birding Photography Tours

